Building A Mountain and Cavern for a Holiday Village
I always wanted to incorporate a mountain and a cave into my miniature holiday village display, but I hadn't included one because I didn't want to store it afterward, so the method I used was one that I could dispose of the mountain after Halloween because it was cheap and easy. Building the frame of the mountain was a learning experience in itself, but ultimately the results looked fantastic and hardly cost me anything.
 \
\It is important to note the general setup of my furniture that the mountain was built on. The top portion of the mountain sat on two bookcases and the bottom portion of the mountain sat on the folding table, which made it very stable since both the top and bottom portions were supported.

Mountain Base
The mountain would be on the side of my nice wood bookcases, so I wanted to protect them. I built the entire mountain and cavern on top of foam poster board.
First, I placed paper towels underneath and around where the foam boards would rest. It is not necessary to do this, but I recommend taking this preventative step if you’re concerned about the underlying furniture or if you want your mountain to be portable.
I used two foam poster boards, duct-taped together in the shape of an L. I had one board under the mountain and one behind it. I cut the vertical board to fit the height of my mountain, so it came just to the ledge of the bookcase.
Methods for Building a Mountain and Cave
I had to change my plans multiple times on how I was going to construct my mountain and cavern. It was due to a bit of bad luck, I guess. So, I have included some information about how I initially planned to build everything, but if you really don't care then skip forward to the paper mache section.
Expanding Spray Insulation Foam
Mountain construction plans #2: use expanding spray insulation foam to create a mountain shape, and carve the details into the foam.
I have used expanding spray insulation foam in the past. It sprays quickly, the foam expands to about triple its original size, and it can be messy. If you decided to use this method to create a mountain here are a couple tips:
- This stuff sticks to whatever it comes into contact with so wear gloves, old clothes, and protect your work surface and all surrounding areas (Seriously it doesn't wash off )
- Completely prepare the frame you are applying the foam to before you start working
- Anticipate the expansion and stickiness. At a minimum, the foam triples in size sticking to everything it comes into contacts, and dries quickly
As luck would have it, there was something wrong with the bottle of foam I used. I could not get it to spray, then, what came out just sort of dribbled out and wasn't expanding. After using the entire bottle my mountain wasn't fully covered. The insulation foam should have tripled in size, so obviously something was wrong with the bottle I had. Maybe it was old... Who knows??
But, with less than 1/2 of a mountain, I had to change my plans, yet again.
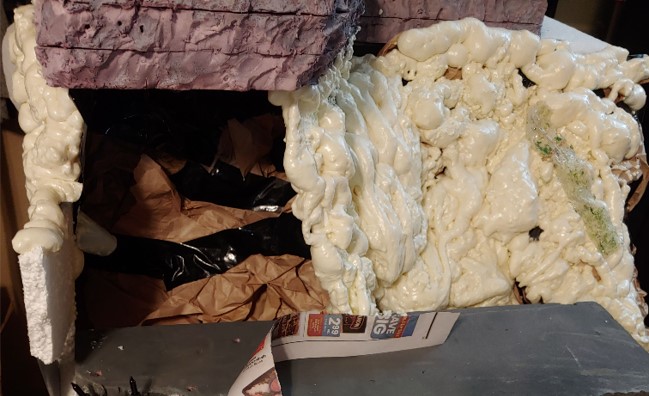

Building a Cave
I decided to include a cavern on the left side of the mountain and I used the same paper mache method as the rest of the mountain. To build the sidewalls of the cave I used a couple of small pieces of styrofoam. I taped them on top of each other and then taped them to the rest of the mountain. I used a piece of duct tape between the two side walls to create the roof of my cave. I then added my paper mache on top of the styrofoam and duct tape.
Paper Mache
I decided paper mache would be the next method I tried. Paper mache is cheap and it uses materials I already had in the house. The results were realistic and didn't take much effort to make it look good. Even before I applied the paint, it looked like a mountain!
Basics Technique
For all paper mache, you start out with a base built into the general shape of whatever your design is. Some people use cardboard taped together, others use crumpled up paper taped/glued together to create a base to paper mache on top of. The paper mache isn't strong enough to be used all on its own, since it doesn't get much stronger than strips of regular paper.
There are quite a few recipes that can be used for paper mache all with very similar results.
A lot of people use flour instead of white school glue. The flour makes the paper mache have a nice smooth effect because of how thick it gets when applied. The problem with using flour is the longevity of the project. I've had projects start to mold when I've used flour. Some people have reported good results from spraying finished projects with acrylic varnish as a sealant. The supplies needed for paper mache are:
- strips of newspaper
- white school glue
- water
To paper mache:
- Coat a strip of newspaper in the glue and water mixture.
- Place the strip in the desired area smoothing down all the edges
- Allow at least 1-2 hours to dry (if painting it allow to dry for 4 hours)
Paper Mache Mountain & Cavern
I purchased brown packaging paper at my local dollar store and started off by tearing off pieces about 12 inches x 24 inches. I crumpled up the pieces of brown paper and taped them onto the foam board. Tape multiple layers of the crumpled paper into the shape of a mountain (larger on the bottom and smaller on top.
TIP: How tightly the paper is crumpled affects the general appearance of the mountainside. I crumpled up and packed the paper much more tightly on the side where I have my cave and on the other side the paper is crumpled up loosely. The loosely crumpled paper softens the ledges and outcroppings, whereas the tightly crumpled paper makes the depth really stand out once painted.
Once I have built the general shape of a mountain I began to paper mache on top of the brown paper. I smoothed down the edges of the newspaper as I applied it, but I then adjusted it to have small wrinkles in the center of each strip of newspaper to get the additional texture I wanted for my mountain. After applying multiple layers of paper mache I let it dry for about 4 hours.
Painting
I applied 3 light coats of grey acrylic paint. I then mixed a little bit of black into my grey paint and I painted all of the shadowed areas of my mountain and cavern. I created another paint mixture of grey and white and I lightly brushed over my mountain just enough to highlight the elevated sections
That was all there was to it... Someday I will try using the plaster sheets. But, until then, despite all of the difficulties I had, I am still satisfied with how my mountain turned out and it was definitely worth the aggravation.
Plaster Sheets
"Plaster Cloth is the easy, convenient method for modeling lightweight land contours and terrain base. The plaster-coated cloth creates a durable hard shell, designed to accept Earth Colors™ Liquid Pigment, paints, plaster castings, and landscape materials easily, with realistic results. Use to fill seams or gaps around rocks, tunnels, and terrain to blend terrain features."
I was so excited to try these plaster sheets... Unfortunately, my apartment flooded before I had a chance to build the mountainside. And, in the haste to pack all of my belongings the roll of plaster sheets was put into a random box of craft supplies and they weren't found until after Halloween. 😩


No comments:
Post a Comment